Getting Started
This guide walks you through the basic steps required to expose an API through Connect.
By the end of this guide, you will:
- Create a Service Provider
- Configure an Account using an API key
- Create a REST Service
- Publish the service to the Gateway
- Test the API through Connect.
- View the request details in Logs.
Prerequisites
Before you begin, make sure you have:
- Access to the Connect Portal
- A running Connect Gateway
- A running REST Service Runtime
- An OAuth2 Client configured in Identity Server
- A test account on https://www.weatherapi.com
- An API testing tool such as Postman or curl
Note: Weather Api is used only as an example because it is easy to sign up and gives you free credits. You can choose to test against any service of your choice.
Step 1 — Create a Provider
A service provider represents the external system or API provider whose services will be accessed through Connect.
- Navigate to Setup → Service Providers
- Click New Provider
- Enter the details
- Save the configuration
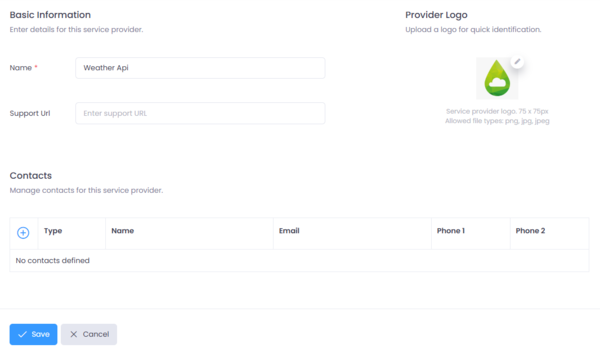
Figure 1: Create a Service Provider
Example:
| Field | Value |
|---|---|
| Name | Weather Api |
| Support Url | https://support.weatherapi.com |
Step 2 — Configure an Account
Accounts store the credentials required to authenticate requests made to the downstream service.
For this example, use a simple API Key based account.
Steps:
- Open the service provider created earlier
- Click Add Account
- Select API Key as the authentication type
- Enter the API key details
- Save the account
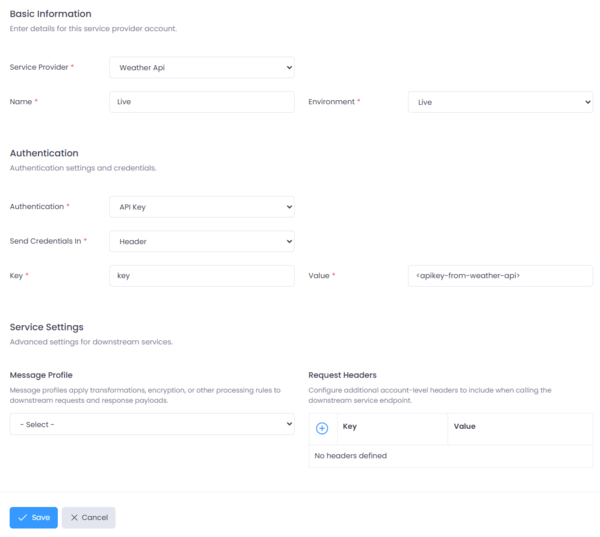
Figure 2: Create a Service Provider Account
Example:
| Field | Value |
|---|---|
| Name | Production |
| Environment | Live |
| Authentication | API Key |
| Add To | Header |
| Key | key |
| Value | ****** |
Note: Name the account to identify your environment or client E.g. Sandbox, Production. Copy the API key from your Weather Api dashboard
Step 3 — Create a REST Service
Once the service provider and account are configured, create a REST service that points to the downstream API.
For this example, use the following endpoint:
https://api.weatherapi.com/v1/current.json
Steps:
- Navigate to Services
- Click Create Service
- Select REST Service
- Enter the service details
- Associate the service with the provider and account created earlier
- Save the service
Example:
| Field | Value |
|---|---|
| Service Provider | Weather Api |
| Name | Get Current Weather |
| Description | Gets the current weather for a city |
| Service Type | REST |
| Country | India |

Figure 1: Create a REST Service
Step 4 — Configure the Service
A gateway route exposes the service through Connect using an upstream path.
Steps:
- Navigate to Services
- Select Get Current Weather
- Click Routing
- Configure the upstream path
- Configure the downstream path
- Select the service account
- Save and publish the service
Example:
| Field | Value |
|---|---|
| Upstream Path | GET /weather |
| Downstream Path | https://api.weatherapi.com/v1/current.json |
| Content-Type | application/json |
| Service Account | Live |
After saving the route, Connect exposes an endpoint similar to:
GET https://[your-connect-gateway]/weather
GET https://connect.celusion.dev/gateway/weather
Step 5 — Obtain an Access Token
Connect APIs are protected using OAuth2 authentication through Identity.
The OAuth2 client must have access to the scopes connect.gateway and connect.restapi.
Before calling the API, obtain an access token using the Client Credentials flow.
Example token request:
POST https://identity.celusion.dev/app/connect/token
Content-Type: application/x-www-form-urlencoded
Request body:
grant_type=client_credentials
client_id=YOUR_CLIENT_ID
client_secret=YOUR_CLIENT_SECRET
scope=connect.gateway connect.restapi
Example using curl:
curl -X POST https://identity.celusion.dev/app/connect/token \
  -H "Content-Type: application/x-www-form-urlencoded" \
  -d "grant_type=client_credentials" \
  -d "client_id=YOUR_CLIENT_ID" \
  -d "client_secret=YOUR_CLIENT_SECRET" \
  -d "scope=connect.gateway connect.restapi"
Example response:
{
  "access_token": "eyJhbGciOiJSUzI1NiIs...",
  "expires_in": 3600,
  "token_type": "Bearer"
}
Copy the access_token value. It will be used to authorize the API request.
Step 6 — Test the New Service
Call the Connect endpoint using Postman or curl.
Include the access token in the Authorization header.
Example request:
GET https://connect.celusion.dev/gateway/weather?q=Mumbai
Authorization: Bearer YOUR_ACCESS_TOKEN
Example using curl:
curl https://connect.celusion.dev/gateway/weather?q=Mumbai \
  -H "Authorization: Bearer YOUR_ACCESS_TOKEN"
Expected request flow:
Client → Connect Gateway → REST Service Runtime → Downstream Weather API → Response
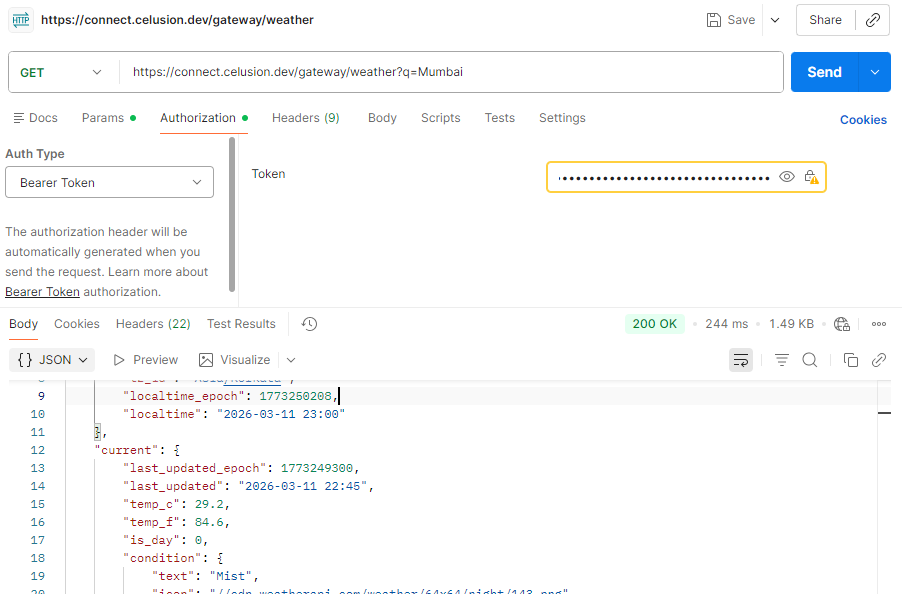
Figure 5: Test the Service using Postman
Step 7 — View Request Logs
After testing the API:
- Navigate to Logs
- Locate the latest request
- Review details such as:
- Upstream path
- Downstream URL
- Response status
- Response time
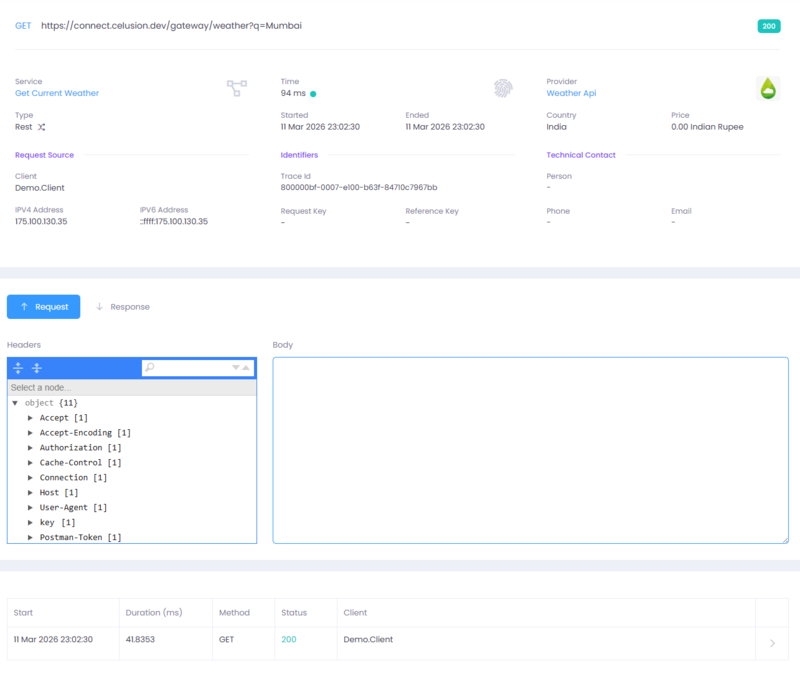
Figure 6: Request Log Details
What You Configured
In this guide, you configured the basic components required to expose an API through Connect:
- A Service Provider representing the external API
- An Account storing authentication credentials
- A REST Service defining how Connect calls the downstream API
- A Gateway Route exposing the service to API consumers
Next Steps
Continue exploring additional Connect capabilities:
- Service Types and Runtimes
- Api Gateway Features
- Service Accounts and Message Profiles
- Api Documentation
- Mock Server
- Monitoring and Alerts